Sunday, January 5, 2014

Add Facebook Popup Widget To Blogger

Add The Below Code in your blogger template

steps to follow


Add Widget


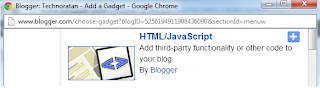
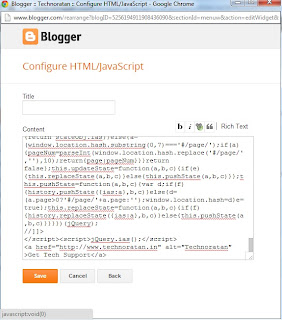
edit ; HTML/JAVA SCRIPT

Copy the Below Javascript into the Content Box


<script src='http://ajax.googleapis.com/ajax/libs/jquery/1.7.2/jquery.min.js' type='text/javascript'></script>
<style>
#fanback {
display:none;
background:rgba(0,0,0,0.8);
width:100%;
height:100%;
position:fixed;
top:0;
left:0;
z-index:99999;
}
#fan-exit {
width:100%;
height:100%;
}
#fanbox {
background:white;
width:420px;
height:270px;
position:absolute;
top:58%;
left:63%;
margin:-220px 0 0 -375px;
-webkit-box-shadow: inset 0 0 50px 0 #939393;
-moz-box-shadow: inset 0 0 50px 0 #939393;
box-shadow: inset 0 0 50px 0 #939393;
-webkit-border-radius: 5px;
-moz-border-radius: 5px;
border-radius: 5px;
margin: -220px 0 0 -375px;
}
#fanclose {
float:right;
cursor:pointer;
background:url(https://blogger.googleusercontent.com/img/b/R29vZ2xl/AVvXsEiSAXjA-LKXbLSTnm-Z6SB2Yl42_uqFtXJLHL3-TUfOYXIT1afYokFjEywt0RF0KZdrWFnDOGyCDvRiEH-v9yPnWjSynB_1op5cWlviNMEi9ShyfieYKFClvfqo08nsO-vj4_IcmrX9dHpU/s1600/fanclose.png) repeat;
height:15px;
padding:20px;
position:relative;
padding-right:40px;
margin-top:-20px;
margin-right:-22px;
}
.remove-borda {
height:1px;
width:366px;
margin:0 auto;
background:#F3F3F3;
margin-top:16px;
position:relative;
margin-left:20px;
}
#linkit a.visited,#linkit a,#linkit a:hover {
color:#80808B;
font-size:10px;
margin: 0 auto 5px auto;
float:center;
}
</style>


<script type='text/javascript'>
//<![CDATA[
jQuery.cookie = function (key, value, options) {
// key and at least value given, set cookie...
if (arguments.length > 1 && String(value) !== "[object Object]") {
options = jQuery.extend({}, options);
if (value === null || value === undefined) {
options.expires = -1;
}
if (typeof options.expires === 'number') {
var days = options.expires, t = options.expires = new Date();
t.setDate(t.getDate() + days);
}
value = String(value);
return (document.cookie = [
encodeURIComponent(key), '=',
options.raw ? value : encodeURIComponent(value),
options.expires ? '; expires=' + options.expires.toUTCString() : '', // use expires attribute, max-age is not supported by IE
options.path ? '; path=' + options.path : '',
options.domain ? '; domain=' + options.domain : '',
options.secure ? '; secure' : ''
].join(''));
}
// key and possibly options given, get cookie...
options = value || {};
var result, decode = options.raw ? function (s) { return s; } : decodeURIComponent;
return (result = new RegExp('(?:^|; )' + encodeURIComponent(key) + '=([^;]*)').exec(document.cookie)) ? decode(result[1]) : null;
};
//]]>
</script>
<script type='text/javascript'>
jQuery(document).ready(function($){
if($.cookie('popup_user_login') != 'yes'){
$('#fanback').delay(100).fadeIn('medium');
$('#fanclose, #fan-exit').click(function(){
$('#fanback').stop().fadeOut('medium');
});
}
$.cookie('popup_user_login', 'yes', { path: '/', expires: 7 });
});
</script>
<div id='fanback'>
<div id='fan-exit'>
</div>
<div id='fanbox'>
<div id='fanclose'>
</div>
<div class='remove-borda'>
</div>
<iframe allowtransparency='true' frameborder='0' scrolling='no' src='//www.facebook.com/plugins/likebox.php?
href=http://www.facebook.com/4geeksworld.blogspot.in=402&height=255&colorscheme=light&show_faces=true&show_border=false&stream=false&header=false'
style='border: none; overflow: hidden; margin-top: -19px; width: 402px; height: 230px;'></iframe><center>
<span id="linkit"><a href="http://4geeksworld.blogspot.in/2014/01/add-facebook-popup-widget-to-blogger.html">Facebook Popup Widget</a></span></center>

</div>

</div>


-------------------------

Customize It


Replace facebook.com/4geeksworld.blogspot.in with your facebook username


If you want the Popup to appear every time the User Reloads or access the website


Delete the below code

$.cookie('popup_user_login', 'yes', { path: '/', expires: 7 });


THANK you, DON'T miss COMMENT


Friday, January 3, 2014

Control Your Computer Anywhere,Away From Home using Remote Assistance Host


Instructions

  1. Remote Assistance Host


  • 1
    Create an invitation from the host -- the computer you want to control remotely. Click “Start” and “Control Panel.” Type “Remote Settings” in the search bar and press “Enter.” Click “Allow Remote Access to Your Computer.” Ensure that there is a check in the box, and then click “Advanced.”


  • 2
    Choose the length of time for the invitation to stay open, up to 30 days. Click “OK,” and then click “OK” again.
    • 3
      Click “Start” and type “Remote Assistance,” and then press “Enter.”
    • 4
      Click “Invite Someone You Trust to Help You.” Save the invitation as a file and attach it to an email if you use a Web-based client, or use Outlook to automatically attach it.
    • 5
      Email the invitation to an account that you can access from your remote location. The attachment automates the connection process; if you don’t receive the email, you can't control the host computer.
    • 6
      Change your host computer's hibernation and sleep settings, if applicable, via the Control Panel, in Hardware and Sound, under Power Options. If the host computer is hibernating or sleeping when the Remote Assistance request comes from the remote computer, you won’t be able to connect.

    Remote Assistance Connection

    • 7
      Launch your email program or website on the remote computer. Open the email you sent to yourself and the attachment with the invitation. Windows then will automatically launch its Remote Desktop Connection software.
    • 8
      Connect to the host computer and perform your desired tasks. Enter your administrator password to allow changes to your system and to gain access through your computer’s firewall, if needed.
    • 9
      Close the connection only when you've completed all desired tasks, as you won’t be able to reconnect without a new invitation from the host computer. Reconnect using the same process if you accidentally lose the connection on your end; if the connection is lost on the host end, you can't re-establish it.

  • Thursday, January 2, 2014

    Ways to Improve Your Wireless Router

    who has experienced seemingly random disconnections while trying to surf the Web, stream movies or play online games understands the frustrations that come from poor wireless signal strength. 
    Fortunately, you don’t have to run out and buy a brand-new router just yet. 
    Here are some ways you can improve your router’s performance for almost free.

    1. Position Your Router in an Open Space

    Just like Superman’s X-ray vision, wireless signals have a difficult time penetrating metal and other dense objects. Obstructions such as metal filing cabinets, pipes and walls can limit your wireless connection, and the more obstructions between your router and computer, the more severe the interference.
    Place the router in the open away from interfering objects to maximize signal strength. Similarly, placing your router in a corner of your house (or worse, in the basement) can reduce its range and capacity, as the signal loses efficacy every time it passes through an obstruction. Keeping the router in a central location can significantly improve your Wi-Fi’s performance.

    2. Change your Wireless Channel

    Wireless routers use specific channels (one of 11) to send and receive data. The more routers operating on a certain channel, the slower all their connections will be. You can use a free tool such as inSSIDer (www.metageek.net/products/inssider) to scan for nearby Wi-Fi networks and detect which wireless channel they’re using, then switch to a channel that’s more open.
    If the majority of surrounding routers are using channel 1, for instance, those people will suffer from limited range and power. Switching your wireless channel is easy enough — just read the documentation that came with your router to find the IP address for its configuration page (or type “ipconfig” into a command line, and find the address listed for Default Gateway). Then type that address into your browser’s address bar. You can change your wireless channel from there.

    3. Update your Router’s Firmware

    Like any piece of hardware, your router can eventually fall out of date. Router manufacturers routinely roll out new firmware for their products, which fixes bugs and increases performance and reliability. Unfortunately, wireless routers don’t often inform users that an update for their firmware is available.
    The good news is that downloading and applying the update is a fairly simple process. First, look on the back of your router to find the model and version numbers. With those in hand, go to the manufacturer’s website to find the latest firmware for your router. After you’ve downloaded the file, install it by opening the router’s configuration page (described in the previous tip), opening the tab for Firmware Upgrade and choosing the downloaded file as the source. Let the upgrade process complete before clicking on any other link on the router configuration page.

    4. Update your Wireless Adapter Drivers

    Like your router, your wireless adapter also receives periodic updates, some of which can boost your Wi-Fi performance. To get the latest drivers, you’ll need to find out which manufacturer the adapter comes from. Head to Device Manager in the Control Panel; once there, expand Network Adapters to find your adapter’s model and make. Next, go to the manufacturer’s website and download the latest drivers for your device.
    If the file is an executable (i.e., a “.exe” file), just run the program. Otherwise, head back to Device Manager and double-click the name of the wireless adapter. Once there, click the Driver tab and select Update Driver. Finally, select “Browse my computer for driver software” and select the file you downloaded from the manufacturer.

    5. Replace your Router’s Antenna

    Although most new routers feature internal antennas — which are difficult to modify or replace — some still use external antennas. These antennas are typically omnidirectional to ensure that the signal reaches every part of your home equally. However, if your router is positioned near an outside wall or in the corner of your home — and you can’t move it — half or more of the signal will be lost as the antenna beams data into the wall.
    Installing a high-gain antenna can maximize your router’s signal strength, as it allows you to aim the wireless signal in a single direction. On the other hand, if an omnidirectional antenna works best for you (for instance, if your router is placed in the center of your home), consider purchasing a longer antenna, as these generally boast better performance. The documentation that came with your router should provide specific instructions on how to replace the antenna.
    Fortunately, replacement antennas aren’t expensive. For example, a high-gain antenna for a Linksys WRT54GL Wireless-G Broadband Router — one of the most popular routers on Amazon.com — costs about $8 via the online retailer.

    6. Add a Wireless Repeater

    You can use a wireless repeater to extend the range of your wireless router without moving the router itself or installing any extra wiring. The repeater’s name implies how it works — it just identifies the signal being transmitted by the router and “repeats” the signal at its location at full strength.
    Some of the signal integrity gets lost when the repeater rebroadcasts the signal, making a wireless repeater less optimal than a wired repeater if signal integrity is your primary concern. On the other hand, using a wireless repeater obviates the need for extra wiring, making it much more convenient.
    Wireless repeaters range in price from about $25 to as much as several hundred dollars. The popular Amped Wireless-N Smart Repeater and Range Extender will run you $119.
    To set up your wireless repeater, follow these steps:
    1. First, access the device’s system menu (as described in the manual).
    2. Ensure that the repeater and the router use the same SSID (your wireless network’s name and password).
    3. Give your repeater the same MAC address as the router.
    4. To find out your router’s MAC address, open the command prompt in Windows and type “ipconfig /all.” The MAC address will be listed next to the heading Physical Address.
    5. Finally, place the repeater halfway between your router and your computer, and check to see if it’s receiving a WLAN signal.

     7. Using DD-WRT 

    This tip is recommended only for advanced users. You can download DD-WRT, a free piece of Linux-based firmware designed to improve signal strength and add new features to your router (such as the ability to selectively throttle the bandwidth of specific programs). More and more routers are supported by DD-WRT, so it’s likely that if you’re using a router from one of the major vendors, you’ll be able to install the software.
    Note that installing DD-WRT can void your warranty and is exceedingly difficult to remove once installed. The installation can also be somewhat laborious, and — if you’re not careful — can result in “bricking” your router if an error occurs while flashing the firmware. The installation process is too detailed to explain here, but, thankfully, the developer maintains a wiki (www.dd-wrt.com/wiki) that includes a step-by-step guide to installing DD-WRT, as well as instructions on how to recover your router should it become bricked.
    (from other sources)
    thank you
     

    Monday, May 21, 2012

    Send and Receive WhatsApp Messages on Windows PC

    WhatsApp is popular free messaging client which is available for iOS, Android, Nokia and Blackberry, but still we have no client for Windows PC officially released by the WhatsApp team. Well you can imagine having WhatsApp on your PC and how fast you will be able to send and receive text messages as you always be on one device so you can handle everything right there. So we found an unofficial client which is supposed to be a dummy version of Android running on your PC.

    BlueStacks App Player Android Emulator :

    BlueStacks App Player helps you install WhatsApp and thousands other application because its an Android operating system running on your Windows PC. Now obviously its not like you will get that same kind of experience you can do with a touch phone and Android installed on it but still if you are a WhatsApp fan than I must that this software is must for you because WhatsApp experience on this one is simply unbelievable faster texting and media exchanging.
    bluestacks-app-player-windows

    Steps to Install WhatsApp on BlueStacks App Player :

    So if you are interested in using WhatsApp right on your PC that you can grab some installation knowledge from below and start experiencing right now.
    1. Download BlueStacks App Player for Windows PC.
    2. After you have downloaded the above software, start installing it and it will start downloading its package from the internet, it will take some time so sit back and have a cup of coffee.
    3. So after downloading it will install and now you will see their user interface, now you have to sign up for your new account or if you already have their account than you can login.
    bluestacks-whatsapp-messenger
    4. Now just search for the WhatsApp like in the above image or find it from the popular downloads hovering right above in the Rocket Dock, after you find it click on it and it will start downloading the app.
    5. After WhatsApp is installed click on it and you will see a Terms and Conditions page where you have to click on Agree and than you will be on their main phone verification page.
    bluestacks-whatsapp-verification
    6. Now just select your country and than insert your mobile number and than click on OK.
    bluestacks-whatsapp-verification
    7. Now it will start the process of sending you the verification message on your mobile, if that thing fails you also have an option to call your number for the verification message. So now just insert that code and click on OK boom you have successfully activated your WhatsApp messenger on your Windows PC.
    bluestacks-whatsapp-messages
    8. So now WhatsApp is ready for some action, select your already created groups, if you were having one on your mobile or you can start sending text or media messages to your friends and create another new group, so I was just messing around my group Wild Hogs, and tried sending some messages and delivery was amazingly fast and responsive.
    So now enjoy WhatsApp on your Windows PC with this amazing BlueStacks App Player, well you can also download and install other amazing Android Application which you can search and than download, hope you liked this lengthy tutorial, please share it with all your friends.(from other sources)

    Download link-http://www.bluestacks.com/

    How to Install Paid Android Applications For Free

    Update : Many people commented that they see blank screen while using Applanet app, well I think so that will be fixed soon or else you can use BlackMart Alpha app for Android device which is similar to the Applanet app but works somewhat fine.
    applanet app androidAndroid is one of the best OS available right now as its is owned and developed by Google. Now all the latest phones comes with this new OS preinstalled in them and its really awesome. You have many apps and games which you can play on your smart phone but the thing is that many good ones are paid, so to get those paid ones you have to link your debit card than pay them and than you can enjoy those games or you can simply install a simple app with which you can download those apps for free of cost.
    Applanet is that small awesome application for Android devices with which you can download any apps or games those are paid for free. It is somewhat same like Installous app we have for iPhone which we install using Cydia.

    How Applanet Works :

    Applanet is a simple app for Android which simply provides with the paid apps and games for free which you can download right on phone. You simply download and install this app and than search - download - install any application from it for free. Its totally free of charge and simply takes few minutes to install.

    How to Download & Use Applanet :

    Now if you also want to install paid apps and games for free on your android device than simply Download Applanet App for your android phone and than copy it to your phone, now navigate to it through file manager or anything and click on it to install it.
    Now simply navigate to this app from your application menu and fire it up, enjoy searching and downloading apps on the go. If you find this difficult and cannot make it up with it than comment below with your problem and hopefully I will solve it for you.

    Sunday, April 24, 2011

    Cain And Abel 4.9.40 Is Available For Download

    Cain and abel is a very popular windows password recovery program, It allows you to recover almost all kinds of passwords, It also supports wide variety of password cracking methods such as a brute force attack, Dictionary attack, Rainbow Tables, Cryptanalysis attack etc, Cain is mostly used for the purpose of sniffing and also used to carry out wide variety of Man In the middle attacks.


    Features


    The Oxid team has just released the newest version of cain and abel software i.e. Cain and abel 4.9.40, Here are some of the added features in cain and abel 4.9.40:

    • Added Proxy support for Cain's Certificate Collector.
    • Added the ability to specify custom proxy authentication credentials for Certificate Collector.
    • Added ProxyHTTPS Man-in-the-Middle Sniffer (TCP port 8080).
    • HTTP, APR-HTTPS and APR-ProxyHTTPS sniffer filters are now separated.
    • Added progress bar indicator in the off-line capture file function.
    • Bug fixed in ProxyHTTPS Man-in-the-Middle Sniffer parsing "Connection Established" string.
    • Bug fixed in VoIP Sniffer creating MP3 Mono files.
    • Bug fixed in RTP Sniffer processing off-line capture files.
    • WinRTGen recompiled with OpenSSL library version 0.9.8q.
    • OpenSSL library upgrade to version 0.9.8q.
    • Winpcap library upgrade to version 4.1.2.
    You can download Cain and Abel 4.9.40 here

    Sqlmap 0.9 Available For Download Now

    Sqlmap is a very popular tool used which automates the method of discovering a Sql injection flaw in a web application and exploitation part as well. Sqlmap team has just released the newest version of Sqlmap, Sql map comes in with lots of changes including a fully re-written SQL Injection flaw detecting engine.


    Features

    Here are some of the newset features in Sqlmap 0.9:

    • Rewritten SQL injection detection engine (Bernardo and Miroslav).
    • Support to directly connect to the database without passing via a SQL injection, -d switch (Bernardo and Miroslav).
    • Added full support for both time-based blind SQL injection and error-based SQL injection techniques (Bernardo and Miroslav).
    • Implemented support for SQLite 2 and 3 (Bernardo and Miroslav).
    • Implemented support for Firebird (Bernardo and Miroslav).
    • Implemented support for Microsoft Access, Sybase and SAP MaxDB (Miroslav).
    • Added support to tamper injection data with –tamper switch (Bernardo and Miroslav).
    • Added automatic recognition of password hashes format and support to crack them with a dictionary-based attack (Miroslav).
    • Added support to fetch unicode data (Bernardo and Miroslav).
    • Added support to use persistent HTTP(s) connection for speed improvement, –keep-alive switch (Miroslav).
    • Implemented several optimization switches to speed up the exploitation of SQL injections (Bernardo and Miroslav).
    • Support to parse and test forms on target url, –forms switch (Bernardo and Miroslav).
    • Added switches to brute-force tables names and columns names with a dictionary attack, –common-tables and –common-columns.
    You can download Sqlmap 0.9 here

    Saturday, April 16, 2011

    how to find serial key of any software for free

    Serials.BE

     you can find serial key,crack of any software either it is new or old


    thank you....

    please follow blog and comment on post

    Trick On How To Hide Drive Using Command Prompt

    Follow these simple steps To Hide Disk Drive
    1. Click on Start Button in taskbar and then goto Run
    2. In Run type cmd. (This will open Command Prompt)
    3. Now type Diskpart in command prompt and press Enter key. (This will start your Diskpart session)
    4. Now type List volume (This will list all your volumes)
    5. Now you have to select a volume that you want to hide.Example Type select 3 and your volume 3 will be selected.
    6. Type Remove letter F (you should type your volume name instead of F).
    7. The drive will now get hidden(If not just restart your computer).
    Trick on How To Unhide The Hidden drive Using Command prompt
    1. To Unhide the Drive follows the steps 1-5 as mentioned above.
    2. Now Type assign letter F (You should type your volume name instead of F)
    3. Now your hidden drive will be visible.(If not just Restart your computer)

    Monday, March 21, 2011

    Hack Administrator Password In Windows 7,Xp And Vista

    Most of us might have experienced a situation when we forget our Windows administrator password.And we are not able to login into windows and access our all necessary data and programs.At that time the only solution that comes into or mind is the installation of fresh copy of windows but this will lead to loss of all data and files that are in the windows drive.There is also another way around using which you don’t need to install a fresh copy of windows and without losing any data.We are providing here the method to reset windows administrator password.This tutorial is only for the purpose of recovering your windows 7,xp or vista password.This should be used only when you forgot or lost your password and not for hacking into somebody else’s system.Using this hack you can reset your administrator password or leave it blank.

    By using this tutorial

    1.You donot need to know anything about your old password.
    2.You can unlock locked or disabled accounts.
    3.Also edit the registry.


    The requirements for using this method are:-
    1.Blank CD/floppy disk.
    2.Access to Internet.
    3.Cd or floppy writer

    These requirements can be easily fulfilled by spending 15 minutes in cybercafe or at friends computer
    Now here is the step by step tutorial with screenshots on how to hack administrator password in windows 7,vista or xp
    1.Download this small utility.

    Click Here To Download

    2.You will get an zipped file with ISO image in it.Extract his image using winrar or inbuilt windows software.
    3.Put your blank cd in CD-ROM and burn this using Nero or any other image burner software.this is most important step and make sure you burn the ISO image properly.
    4.Now put this CD in the system whose password is to be reset.
    5.Restart your system and when prompted press enter to boot from the CD.

    Note:If you do not get prompt of boot from CD.Then restart you system and press f2 or f6 or f8 or Esc key(anyone of them should work for your system) before the booting of the windows start.Now you will enter into bios and you should change the boot order from here with the first preference as CD-ROM.And again restart your system.

    6.Now the software will load automatically.It will ask you to select the windows drive and after that provide you with the option of resetting password.